iptables (Ελληνικά)
Το iptables είναι ένα εργαλείο γραμμής εντολών για τη ρύθμιση του firewall του Linux kernel, υλοποιημένο μέσα στο Netfilter project. Ο όρος iptables χρησιμοποιείται επίσης συχνά όταν αναφερόμαστε στο firewall σε επίπεδο kernel. Μπορεί να παραμετροποιηθεί κατ' ευθείαν με το iptables, ή χρησιμοποιώντας ένα από τα πολλά frontends[broken link: invalid section] και GUIs[broken link: invalid section]. Το iptables χρησιμοποιείται για το IPv4 και το ip6tables για το IPv6.
Το nftables βγήκε με την έκδοση του Linux kernel 3.13, και θα αντικαταστήσει μια μέρα το iptables ως το κύριο εργαλείο του Linux firewall.
Εγκατάσταση
Ο stock πυρήνας του Arch Linux είναι compiled με την υποστήριξη του iptables. Θα χρειαστείτε μόνο να εγκαταστήσετε τα userland εργαλεία, τα οποία παρέχονται με το πακέτο iptables στα official repositories. (Το πακέτο iproute2 από το base group έχει ως εξάρτηση το iptables, οπότε το πακέτο iptables θα πρέπει να είναι εγκατεστημένο στο σύστημά σας by default.)
Βασικές έννοιες
Το iptables χρησιμοποιείται για να επιθεωρήσει, τρποποποιήσει, προωθήσει, ανακατευθύνει και/ή απορρίψει IPv4 πακέτα. Ο κώδικας για το φιλτράρισμα των IPv4 πακέτων είναι ήδη ενσωματωμένος στον πυρήνα και οργανώνεται σε μία συλλογή από πίνακες(tables), ο καθένας με ένα συγκεκριμένο σκοπό. Οι πίνακες είναι φτιαγμένοι από ένα σύνολο προκαθορισμένων αλυσίδων(chains), και οι αλυσίδες περιέχουν κανόνες οι οποίοι διασχίζονται κατά σειρά. Κάθε κανόνας αποτελείται από ένα κατηγόρημα με πιθανά matches και μία αντίστοιχη δράση (που ονομάζεται στόχος(target)) η οποία εκτελείται αν το κατηγόρημα είναι αληθές, πχ. οι καταστάσεις ταιριάζουν. Το iptables είναι το εργαλείο του χρήστη που σου επιτρέπει να δουλέψεις με αυτές τις αλυσίδες/κανόνες. Οι περισσότεροι νέοι χρήστες βρίσκουν την πολυπλοκότητα του linux IP routing αρκετά τρομακτική, αλλά στην εφαρμογή, οι πιο συχνές περιπτώσεις χρήσης (NAT και/ή βασικό Internet firewall) είναι πολύ λιγότερο περίπλοκες.
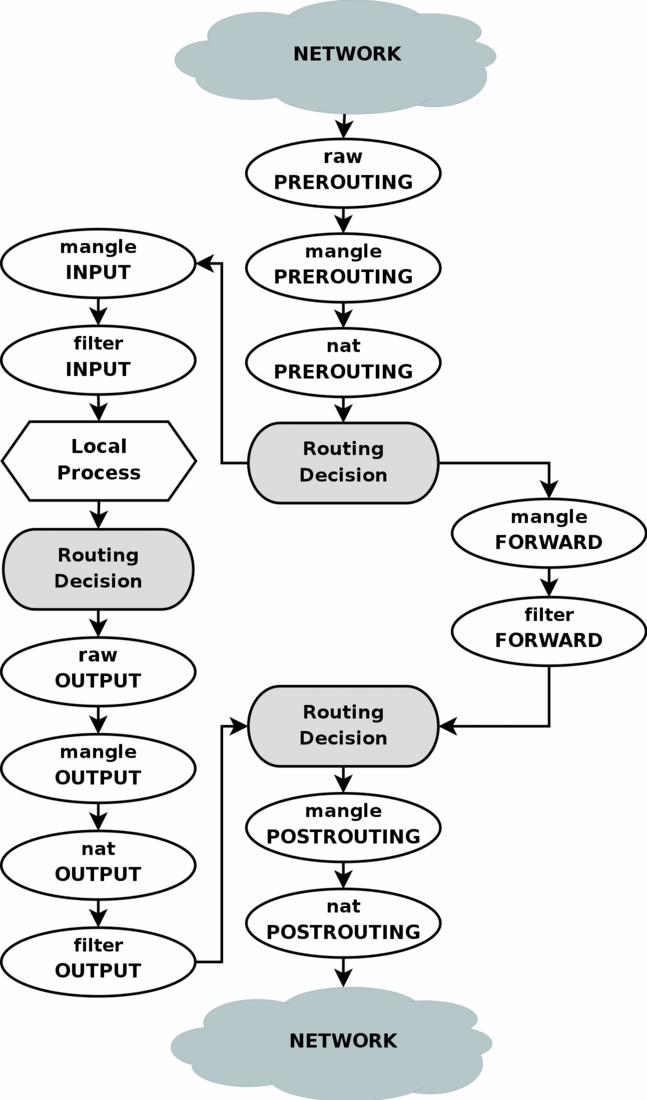
Το κλειδί για να καταλάβει κανείς πως δουλέυει το iptables, είναι αυτό το διάγραμμα. Η λέξη με πεζά στην κορυφή είναι ο πίνακας και η λέξη με κεφαλαία από κάτω είναι η αλυσίδα. Κάθε IP πακέτο το οποίο εισέρχεται σε οποιοδήποτε network interface περνάει μέσω αυτού του διαγράμματος από πάνω προς τα κάτω. Μία συχνή πηγή σύγχυσης είναι ότι τα πακέτα τα οποία εισέρχονται, πχ. από ένα internal interface, διαχειρίζονται διαφορετικά από αυτά τα οποία εισέρχονται από ένα interface που βγαίνει στο Internet. Όλα τα interfaces διαχειρίζονται το ίδιο. Εξαρτάται από το χρήστη να ορίσει κανόνες που συμπεριφέρονται διαφορετικά. Φυσικά, κάποια πακέτα προορίζονται για τοπκικές διεργασίες (local processes), ως εκ τούτου έρχονται από την κορυφή του διαγράμματος και σταματούν στο <Local Process>, ενώ άλλα πακέτα δημιουργούνται από τοπικές διεργασίες τα οποία ξεκινούν από το <Local Process> και προχωρούν προς τα κάτω δια μέσου του διαγράμματος. Μία λεπτομερής εξήγηση του πώς δουλεύει αυτό το διάγραμμα μπορεί να βρεθεί εδώ.
Στην πλειοψηφία των περιπτώσεων δε θα χρειαστεί να χρησιμοποιήσετε τους πίνακες raw, mangle, ή security καθόλου. Έτσι, το ακόλουθο διάγραμμα απεικονίζει μία απλοποιημένη ροή πακέτων του δικτύου μέσω του iptables:
                               XXXXXXXXXXXXXXXXXX
                             XXX     Network    XXX
                               XXXXXXXXXXXXXXXXXX
                                       +
                                       |
                                       v
 +-------------+              +------------------+
 |table: filter| <---+        | table: nat       |
 |chain: INPUT |     |        | chain: PREROUTING|
 +-----+-------+     |        +--------+---------+
       |             |                 |
       v             |                 v
 [local process]     |           ****************          +--------------+
       |             +---------+ Routing decision +------> |table: filter |
       v                         ****************          |chain: FORWARD|
****************                                           +------+-------+
Routing decision                                                  |
****************                                                  |
       |                                                          |
       v                        ****************                  |
+-------------+       +------>  Routing decision  <---------------+
|table: nat   |       |         ****************
|chain: OUTPUT|       |               +
+-----+-------+       |               |
      |               |               v
      v               |      +-------------------+
+--------------+      |      | table: nat        |
|table: filter | +----+      | chain: POSTROUTING|
|chain: OUTPUT |             +--------+----------+
+--------------+                      |
                                      v
                               XXXXXXXXXXXXXXXXXX
                             XXX    Network     XXX
                               XXXXXXXXXXXXXXXXXX
Πίνακες
Το iptables περιέχει πεντε πίνακες:
-
rawχρησιμοποιείται μόνο για τη ρύθμιση πακέτων έτσι ώστε να εξαιρούνται από την παρακολούθηση της σύνδεσης. -
filterείναι ο default πίνακας, και είναι εκεί όπου λαμβάνουν μέρος όλες οι δράσεις που συνήθως συνδέονται με ένα firewall. -
natχρησιμοποιείται για το network address translation (πχ. port forwarding). -
mangleχρησιμοποιείται για ειδικές μετατροπές πακέτων (δείτε το Mangled packet). -
securityχρησιμοποιείται για Mandatory Access Control κανόνες δικτύου (πχ. SELinux -- δείτε αυτό το άρθρο για περισσότερες λεπτομέρειες).
Στις περισσότερες περιπτώσεις θα χρησιμοποιήσετε μόνο δύο από αυτούς: filter και nat. Οι άλλοι πίνακες στοχεύουν σε πολύπλοκες ρυθμίσεις που περιλαμβάνουν πολλαπλά routers και routing αποφάσεις και είναι είναι πέρα από το πεδίο αυτών των εισαγωγικών παρατηρήσεων.
Αλυσίδες
Οι πίνακες αποτελούνται από αλυσίδες, λίστες κανόνων που ακολουθούνται διαδοχικά. O προεπιλεγμένος πίνακας, ο filter, περιέχει τρεις ενσωματομένες αλυσίδες: τη INPUT, τη OUTPUT και τη FORWARD, που ενεργοποιούνται κατά διαφορετικές στιγμές της διαδικασίας φιλτραρίσματος πακέτων, όπως υποδικνύει το διάγραμμα. Ο πίνακας nat περιέχει τις αλυσίδες PREROUTING, POSTROUTING, και OUTPUT.
Δείτε μια περιγραφή των ενσωματομένων αλυσιδών σε άλλους πίνακες στο iptables(8).
Αρχικά, καμία αλυσίδα δεν περιέχει κανόνες. Ο χρήστης γράφει κανόνες στις επιθυμιτές του αλυσίδες, οι οποίες έχουν μια προεπιλεγμένη πολιτική, συνήθως ρυθμισμένη στο ACCEPT, η οποία μπορεί να επαναφερθεί στο DROP ώστε να εξασφαλιστεί ότι τίποτα δεν ξεφέυγει από το σύνολο κανόνων. Η προεπιλεγμένη πολιτική πάντοτε εφαρμόζεται στο τέλος, μόνο, της κάθε αλυσίδας, και έτσι το πακέτο πρέπει να περάσει από όλους τους υπάρχοντες κανόνες στην αλυσίδα προτού αυτή να εφαρμοστεί.
Προσθέτοντας αλυσίδες που καθορίζονται απο το χρήστη, τα σύνολα κανόνων είναι πιο αποτελεσματικά ή τροποποιούνται ευκολότερα. Δείτε το Simple stateful firewall για ένα παράδειγμα της χρήσης τους.
Κανόνες
Το φιλτράρισμα των πακέτων βασίζεται σε κανόνες', που καθορίζονται από πολλαπλές ζεύξεις, προϋποθέσεις που πρέπει να τηρεί το πακέτο για να εφαρμοστεί ο κανόνας, και έναν στόχο, τη δράση που λαμβάνεται όταν το πακέτο ταιριάζει όλες τις προϋποθέσεις. Τυπικές περιπτώσεις ζεύξης κανόνα είναι η εύρεση της επιφάνειας απ' όπου προέρχεται το πακέτο (όπως eth0 η eth1), τί τύπου πακέτο είναι (ICMP, TCP ή UDP) ή η θύρα για την οποία προορίζεται το πακέτο.
Οι στόχοι καθορίζονται με την επιλογή -j ή --jump. Μπορούν να είναι είτε αλυσίδες που ορίζει ο χρήστης (π.χ. "εάν αυτές οι προϋποθέσεις τηρούνται, πήδηξε στην επόμενη χειροκίνητα καθορισμένη αλυσίδα και συνέχισε εκεί την επεξεργασία), είτε ένας από τους ενσωματωμένους στόχους, η κάποια επέκταση αυτών. Οι ενσωματωμένοι στόχοι είναι: ACCEPT, DROP, QUEUE και RETURN. Παραδείγματα επεκτάσεων στόχων είναι οι REJECT και LOG. Εάν ο στόχος είναι ανοίκει στους ενσωματωμένους, η μοίρα του πακέτου αποφασίζεται άμεσα και η επεξεργασία του στον τρέχον πίνακα σταματά. Εάν ο στόχος είναι αλυσίδα που ορίστηκε από τον χρήστη και το πακέτο περάσει επιτυχώς από τη δεύτερη αλυσίδα, θα προχωρήσει στον επόμενο κανόνα της αυθεντικής αλυσίδας. Οι επεκτάσεις στόχων χωρίζονται "τερματικές" (ως ενσωματωμένοι στόχοι) και "μη-τερματικές" (ως αλυσίδες που ορίστηκαν από τον χρήστη), δείτε το iptables-extensions(8) για λεπτομέριες.
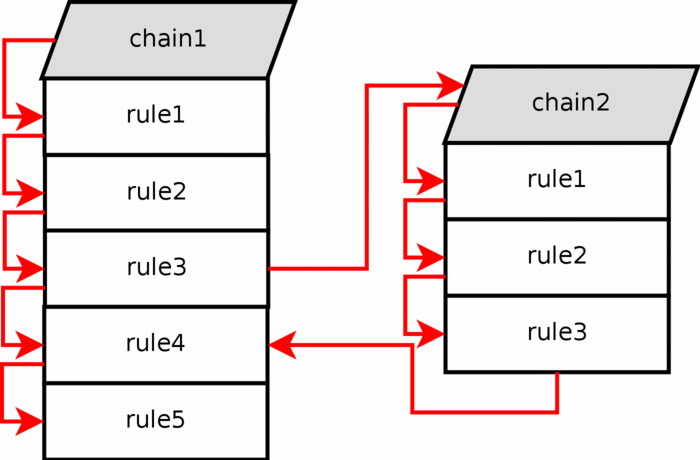
Traversing Chains
A network packet received on any interface traverses the traffic control chains of tables in the order shown in the flow chart. The first routing decision involves deciding if the final destination of the packet is the local machine (in which case the packet traverses through the INPUT chains) or elsewhere (in which case the packet traverses through the FORWARD chains). Subsequent routing decisions involve deciding what interface to assign to an outgoing packet. At each chain in the path, every rule in that chain is evaluated in order and whenever a rule matches, the corresponding target/jump action is executed. The 3 most commonly used targets are ACCEPT, DROP, and jump to a user-defined chain. While built-in chains can have default policies, user-defined chains can not. If every rule in a chain that you jumped fails to provide a complete match, the packet is dropped back into the calling chain as illustrated here. If at any time a complete match is achieved for a rule with a DROP target, the packet is dropped and no further processing is done. If a packet is ACCEPTed within a chain, it will be ACCEPTed in all superset chains also and it will not traverse any of the superset chains any further. However, be aware that the packet will continue to traverse all other chains in other tables in the normal fashion.
Modules
There are many modules which can be used to extend iptables such as connlimit, conntrack, limit and recent. These modules add extra functionality to allow complex filtering rules.
Configuring and Running iptables
iptables is a Systemd service and is started accordingly:
# systemctl start iptables
However, the service will not start unless it finds an /etc/iptables/iptables.rules file, and the Arch iptables package does not come with a default iptables.rule file. So to start the service for the first time:
# touch /etc/iptables/iptables.rules
# systemctl start iptables
or
# cp /etc/iptables/empty.rules /etc/iptables/iptables.rules
# systemctl start iptables
As with other services, if you want iptables to be loaded automatically on boot, you must enable it:
# systemctl enable iptables
From the command line
Showing the current rules
You can check the current ruleset and the number of hits per rule by using the command:
# iptables -nvL
Chain INPUT (policy ACCEPT 0 packets, 0 bytes)
 pkts bytes target     prot opt in     out     source               destination

Chain FORWARD (policy ACCEPT 0 packets, 0 bytes)
 pkts bytes target     prot opt in     out     source               destination

Chain OUTPUT (policy ACCEPT 0 packets, 0 bytes)
 pkts bytes target     prot opt in     out     source               destination
If the output looks like the above, then there are no rules. Nothing is blocked.
To show the line numbers when listing rules, append --line-numbers to that input. This is useful when deleting and adding individual rules.
Resetting rules
You can flush and reset iptables to default using these commands:
# iptables -F
# iptables -X
# iptables -t nat -F
# iptables -t nat -X
# iptables -t mangle -F
# iptables -t mangle -X
# iptables -t raw -F
# iptables -t raw -X
# iptables -t security -F
# iptables -t security -X
# iptables -P INPUT ACCEPT
# iptables -P FORWARD ACCEPT
# iptables -P OUTPUT ACCEPT
The -F command with no arguments flushes all the chains in its current table. Similarly, -X deletes all empty non-default chains in a table.
Individual chains may be flushed or deleted by following -F and -X with a [chain] argument.
Editing rules
Rules can be added either by appending a rule to a chain or inserting them at a specific position on the chain. We will explore both methods here.
First of all, our computer is not a router (unless, of course, it is a router). We want to change the default policy on the FORWARD chain from ACCEPT to DROP.
# iptables -P FORWARD DROP
The Dropbox LAN sync feature broadcasts packets every 30 seconds to all computers it can see. If we happen to be on a LAN with Dropbox clients and do not use this feature, then we might wish to reject those packets.
# iptables -A INPUT -p tcp --dport 17500 -j REJECT --reject-with icmp-port-unreachable
# iptables -nvL --line-numbers
Chain INPUT (policy ACCEPT 0 packets, 0 bytes)
num   pkts bytes target     prot opt in     out     source               destination
1        0     0 REJECT     tcp  --  *      *       0.0.0.0/0            0.0.0.0/0            tcp dpt:17500 reject-with icmp-port-unreachable

Chain FORWARD (policy DROP 0 packets, 0 bytes)
num   pkts bytes target     prot opt in     out     source               destination

Chain OUTPUT (policy ACCEPT 0 packets, 0 bytes)
num   pkts bytes target     prot opt in     out     source               destination
REJECT rather than DROP here, because RFC 1122 3.3.8 requires hosts return ICMP errors whenever possible, instead of dropping packets. In reality, it is best to REJECT packets from hosts who should know about your server's existence, and DROP packets from hosts who should not even know your server exists, or those who appear "up to something".Now, say we change our mind about Dropbox and decide to install it on our computer. We also want to LAN sync, but only with one particular IP on our network. So we should use -R to replace our old rule. Where 10.0.0.85 is our other IP:
# iptables -R INPUT 1 -p tcp --dport 17500 ! -s 10.0.0.85 -j REJECT --reject-with icmp-port-unreachable
# iptables -nvL --line-numbers
Chain INPUT (policy ACCEPT 0 packets, 0 bytes)
num   pkts bytes target     prot opt in     out     source               destination
1        0     0 REJECT     tcp  --  *      *      !10.0.0.85            0.0.0.0/0            tcp dpt:17500 reject-with icmp-port-unreachable

Chain FORWARD (policy DROP 0 packets, 0 bytes)
num   pkts bytes target     prot opt in     out     source               destination

Chain OUTPUT (policy ACCEPT 0 packets, 0 bytes)
num   pkts bytes target     prot opt in     out     source               destination
We have now replaced our original rule with one that allows 10.0.0.85 to access port 17500 on our computer. But now we realize that this is not scalable. If our friendly Dropbox user is attempting to access port 17500 on our device, we should allow him immediately, not test him against any firewall rules that might come afterwards!
So we write a new rule to allow our trusted user immediately. Using -I to insert the new rule before our old one:
# iptables -I INPUT -p tcp --dport 17500 -s 10.0.0.85 -j ACCEPT -m comment --comment "Friendly Dropbox"
# iptables -nvL --line-numbers
Chain INPUT (policy ACCEPT 0 packets, 0 bytes)
num   pkts bytes target     prot opt in     out     source               destination
1        0     0 ACCEPT     tcp  --  *      *       10.0.0.85            0.0.0.0/0            tcp dpt:17500 /* Friendly Dropbox */
2        0     0 REJECT     tcp  --  *      *      !10.0.0.85            0.0.0.0/0            tcp dpt:17500 reject-with icmp-port-unreachable

Chain FORWARD (policy DROP 0 packets, 0 bytes)
num   pkts bytes target     prot opt in     out     source               destination

Chain OUTPUT (policy ACCEPT 0 packets, 0 bytes)
num   pkts bytes target     prot opt in     out     source               destination
And replace our second rule with one that rejects everything on port 17500:
# iptables -R INPUT 2 -p tcp --dport 17500 -j REJECT --reject-with icmp-port-unreachable
Our final rule list now looks like this:
# iptables -nvL --line-numbers
Chain INPUT (policy ACCEPT 0 packets, 0 bytes)
num   pkts bytes target     prot opt in     out     source               destination
1        0     0 ACCEPT     tcp  --  *      *       10.0.0.85            0.0.0.0/0            tcp dpt:17500 /* Friendly Dropbox */
2        0     0 REJECT     tcp  --  *      *       0.0.0.0/0            0.0.0.0/0            tcp dpt:17500 reject-with icmp-port-unreachable

Chain FORWARD (policy DROP 0 packets, 0 bytes)
num   pkts bytes target     prot opt in     out     source               destination

Chain OUTPUT (policy ACCEPT 0 packets, 0 bytes)
num   pkts bytes target     prot opt in     out     source               destination
Configuration file
Iptables rules are, by default in Arch Linux, stored in /etc/iptables/iptables.rules. They are, however, not loaded automatically, instead you can enable the iptables.service which reads this file and loads the rules at boot or when started:
# systemctl enable iptables
# systemctl start iptables
Iptables rules for IPv6 are, by default, stored in /etc/iptables/ip6tables.rules, this file is read by ip6tables.service. You can start it the same way as above.
After adding rules via command-line, the configuration file is not changed automatically — you have to save it manually:
# iptables-save > /etc/iptables/iptables.rules
If you edit the configuration file manually, you have to reload it:
# systemctl reload iptables
Or you can load it directly through iptables:
# iptables-restore < /etc/iptables/iptables.rules
Guides
Logging
The LOG target can be used to log packets that hit a rule. Unlike other targets like ACCEPT or DROP, the packet will continue moving through the chain after hitting a LOG target. This means that in order to enable logging for all dropped packets, you would have to add a duplicate LOG rule before each DROP rule. Since this reduces efficiency and makes things less simple, a logdrop chain can be created instead.
Create the chain with:
# iptables -N logdrop
And add the following rules to the newly created chain:
# iptables -A logdrop -m limit --limit 5/m --limit-burst 10 -j LOG
# iptables -A logdrop -j DROP
Explanation for limit and limit-burst options is given below.
Now whenever we want to drop a packet and log this event, we just jump to the logdrop chain, for example:
# iptables -A INPUT -m conntrack --ctstate INVALID -j logdrop
Limiting log rate
The above logdrop chain uses the limit module to prevent the iptables log from growing too large or causing needless hard drive writes. Without limiting an erroneously configured service trying to connect, or an attacker, could fill the drive (or at least the /var partition) by causing writes to the iptables log.
The limit module is called with -m limit. You can then use --limit to set an average rate and --limit-burst to set an initial burst rate. In the logdrop example above:
iptables -A logdrop -m limit --limit 5/m --limit-burst 10 -j LOG
appends a rule which will log all packets that pass through it. The first 10 consecutive packets will be logged, and from then on only 5 packets per minute will be logged. The "limit burst" count is reset every time the "limit rate" is not broken, i.e. logging activity returns to normal automatically.
Viewing logged packets
Logged packets are visible as kernel messages in the systemd journal.
To view all packets that were logged since the machine was last booted:
# journalctl -k | grep "IN=.*OUT=.*" | less
syslog-ng
Assuming you are using syslog-ng, you can control where iptables' log output goes this way:
filter f_everything { level(debug..emerg) and not facility(auth, authpriv); };
to
filter f_everything { level(debug..emerg) and not facility(auth, authpriv) and not filter(f_iptables); };
This will stop logging iptables output to /var/log/everything.log.
If you also want iptables to log to a different file than /var/log/iptables.log, you can simply change the file value of destination d_iptables here (still in syslog-ng.conf)
destination d_iptables { file("/var/log/iptables.log"); };
ulogd
ulogd is a specialized userspace packet logging daemon for netfilter that can replace the default LOG target. The package ulogd is available in the [community] repository.
See also
- Wikipedia article
- Port knocking
- Official iptables web site
- iptables Tutorial 1.2.2 by Oskar Andreasson
- iptables Debian Debian wiki