Solid state drive/Memory cell clearing
On occasion, users may wish to completely reset the SSD to the initial "clean" state it was manufactured with, thus restoring it to its factory default write performance. Write performance is known to degrade over time even on SSDs with native TRIM support. TRIM only safeguards against file deletes, not replacements such as an incremental save.
Performing the Secure Erase does not reset the wear leveling status of SSD cells - a drive close to the end of its lifespan may become writable for a short while, but it will still fail after a limited amount of writes.
- Back up all data of importance prior to continuing! Using this procedure will destroy all data on the SSD and render it unrecoverable by even data recovery services! Users will have to repartition the device and restore the data after completing this procedure!
- Do not proceed with this if the target drive is not connected directly to a SATA/NVMe interface. Issuing the Secure Erase/Format/Sanitize command on a drive connected via USB or a SAS/RAID card could potentially brick the drive!
SATA drive
Step 1 - Make sure the drive security is not frozen
Issue the following command:
# hdparm -I /dev/sdX | grep frozen
In the security section of the output it should say "not frozen". If it shows as just "frozen" then you cannot continue to the next step. Some BIOSes block the ATA Secure Erase command by issuing a "SECURITY FREEZE" command to "freeze" the drive before booting an operating system.
A possible solution is to simply suspend the system. Upon waking up, it is likely that the freeze will be lifted. If unsuccessful, one can try hot-(re)plug the data cable (which might crash the kernel). If hot-(re)plugging the SATA data cable crashes the kernel try letting the operating system fully boot up, then quickly hot-(re)plug both the SATA power and data cables. If hot-(re)plugging of SATA cables still crashes the kernel, make sure that AHCI is enabled in the BIOS (AHCI allows hot-(re)plugging operations without a crash). Using a USB-to-SATA adapter is an option if it supports hotplugging. One can also use hdparm via USB.
Dell Systems
If the command output shows "frozen", you may be able to work around it by:
- Reboot into the Dell BIOS by pressing F2 on startup.
- Set the Internal HDD Password in the BIOS (be careful, the keymap is en_US / qwerty).
- Apply the changes and reboot.
- When prompted for the password by Dell Security Manager, press Escape rather than entering it. The drive will remain locked but not frozen.
- Skip step 2, and go directly to Step 3 below.
Step 2 - Enable security by setting a user password
Any password will do, as this should only be temporary. After the secure erase the password will be set back to NULL. In this example, the password is PasSWorD as shown:
# hdparm --user-master u --security-set-pass PasSWorD /dev/sdX
security_password="PasSWorD"
/dev/sdX:
Issuing SECURITY_SET_PASS command, password="PasSWorD", user=user, mode=high
As a sanity check, issue the following command
# hdparm -I /dev/sdX
The command output should display "enabled":
Security:
        Master password revision code = 65534
                supported
                enabled
        not     locked
        not     frozen
        not     expired: security count
                supported: enhanced erase
        Security level high
        2min for SECURITY ERASE UNIT. 2min for ENHANCED SECURITY ERASE UNIT.
Step 3 - Issue the ATA Secure Erase command
The final step is to issue the secure erase command, instructing the device's BIOS to erase its contents. Note for the device used in this example, earlier output states:
2min for SECURITY ERASE UNIT. 2min for ENHANCED SECURITY ERASE UNIT.
As per ATA specification the enhanced security erase (--security-erase-enhanced) performs a more elaborate wipe. If the estimated completion time for both commands is equal, it indicates the drive manufacturer shortcut the specification and uses the same erase function for both. A short time (like 2 minutes) in turn indicates the device is self-encrypting and its BIOS function will wipe the internal encryption key instead of overwriting all data cells.[2]
- Triple check that the correct drive designation is used. There is no turning back once the command is confirmed. You have been warned.
- Ensure that the drive is not mounted when this is ran. If a secure erase command is issued while the device is mounted, it will not erase properly.
# hdparm --user-master u --security-erase PasSWorD /dev/sdX
Wait until the command completes. This example output shows it took about 40 seconds for an Intel X25-M 80GB SSD.
security_password="PasSWorD"
/dev/sdX:
Issuing SECURITY_ERASE command, password="PasSWorD", user=user
0.000u 0.000s 0:39.71 0.0%      0+0k 0+0io 0pf+0w
The drive is now erased. After a successful erasure the drive security should automatically be set to disabled (thus no longer requiring a password for access). Verify this by running the following command:
# hdparm -I /dev/sdX
The command output should display "not enabled":
Security:
        Master password revision code = 65534
                supported
        not     enabled
        not     locked
        not     frozen
        not     expired: security count
                supported: enhanced erase
        2min for SECURITY ERASE UNIT. 2min for ENHANCED SECURITY ERASE UNIT.
NVMe drive
The NVMe specification defines a standardized way to format NVMe drives, since those do not use the SATA interface protocol and therefore cannot be cleared in the same way as SATA SSDs. Originally it was the nvme-format(1) command (part of the nvme-cli) which provided this feature, but while it still does Specification 1.3 added support for a dedicated nvme-sanitize(1) command. As described by Jonmichael Hands, NVMe MWG Co-Chair, Sr. Strategic Planner / Product Manager, Intel[3]:
- "These commands are used to securely erase user data from the device. This can be used when deploying a new device, retiring or at device end-of-life, using an SSD for a new application and so on. Sanitize was introduced in NVMe 1.3 specification, so before then NVMe Format was used exclusively to perform secure erase. While both options work, Sanitize is more robust for ensuring the data was properly wiped; format is good for everyday use and testing."
In order to verify what is supported by your drive, use the Identify Controller command:
# nvme id-ctrl /dev/nvme0 -H |grep "Format \|Crypto Erase\|Sanitize"
Example output:
  [1:1] : 0x1	Format NVM Supported
  [29:29] : 0	No-Deallocate After Sanitize bit in Sanitize command Supported
    [2:2] : 0	Overwrite Sanitize Operation Not Supported
    [1:1] : 0x1	Block Erase Sanitize Operation Supported
    [0:0] : 0x1	Crypto Erase Sanitize Operation Supported
  [2:2] : 0x1	Crypto Erase Supported as part of Secure Erase
  [1:1] : 0	Crypto Erase Applies to Single Namespace(s)
  [0:0] : 0	Format Applies to Single Namespace(s)
Then proceed with either format or sanitize.
Format command
The Format command is conceptually closer to a mix of hdparm and fdisk, as it allows to set low-level parameters for the drive and additionally to send a secure erase command.
nvme-format(1) gives the following details about the Secure Erase Settings (-s <ses>, --ses=<ses>) option:
- Secure Erase Settings: This field specifies whether a secure erase should be performed as part of the format and the type of the secure erase operation. The erase applies to all user data, regardless of location (e.g., within an exposed LBA, within a cache, within deallocated LBAs, etc). Defaults to 0.
Possible values :
| Value | Definitions |
|---|---|
| 0 | No secure erase operation requested |
| 1 | User Data Erase: All user data shall be erased, contents of the user data after the erase is indeterminate (e.g., the user data may be zero filled, one filled, etc). The controller may perform a cryptographic erase when a User Data Erase is requested if all user data is encrypted. |
| 2 | Cryptographic Erase: All user data shall be erased cryptographically. This is accomplished by deleting the encryption key. |
While the Format command accepts either the whole NVMe character device (e.g. /dev/nvme0) or a specific namespace block device (e.g. /dev/nvme0n1), make sure this feature is supported by your drive before triggering it. E.g. in the output of the Identify Controller command above, we see that the Crypto Erase Applies to Single Namespace(s) and Format Applies to Single Namespace(s) bits are set to zero, which according to the spec means that "the controller supports format on a per namespace basis" (see figure 249 byte row 524 "Format NVM Attributes (FNA)").
For example, to format /dev/nvme0 with a crypto erase to namespace 1:
# nvme format /dev/nvme0 -s 2 -n 1
See nvme-format(1) for more information and important warnings regarding device/namespace selection.
Sanitize command
The Sanitize command was created to be "functionally equivalent to the command of the same name in SATA and SAS implementations"[4]. From the aforementionned article[5]:
- "According to the NVMe 1.4 specification, “a sanitize operation alters all user data in the NVM subsystem such that recovery of any previous user data from any cache, the non-volatile media, or any Controller Memory Buffer is not possible.”
- The big difference between Sanitize and Format is that sanitize ensures caches are deleted, and the process starts again after an unexpected power loss. Sanitize also supports a pattern overwrite for a secure erase operation, which is terrible for NAND endurance but can be used with other types of storage and memory classes, or for more certainty that user data cannot be recovered."
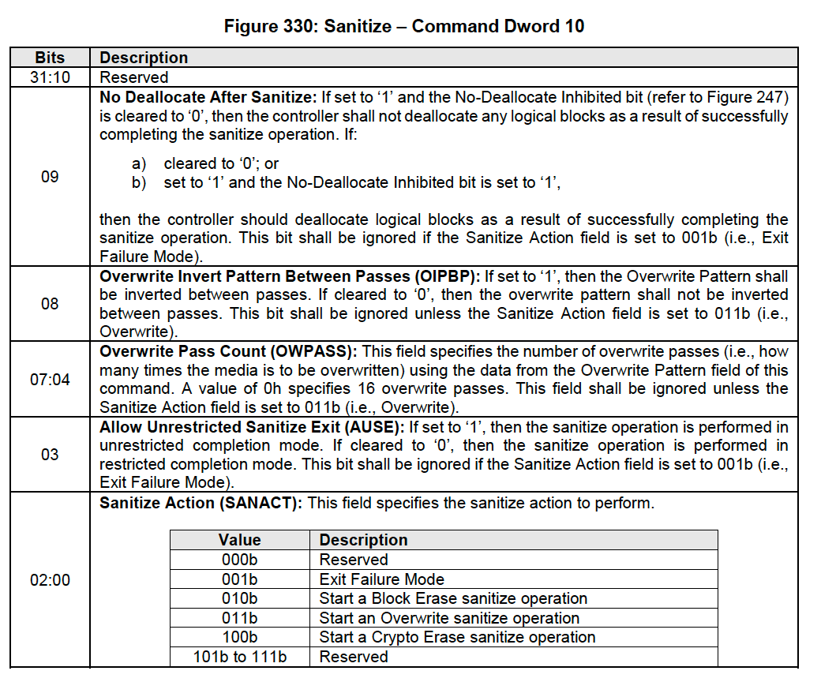
Usage and possible values for the -a/--sanact options are[6]:
-a <action>
--sanact=<action>
    Sanitize Action
    000b - Reserved
    001b - Exit Failure Mode
    010b - Start a Block Erase sanitize operation
    011b - Start an Overwrite sanitize operation
    100b - Start a Crypto Erase sanitize operation
000b = 0, 001b = 1, 010b = 2... 111b = 7.See nvme-sanitize(1) for more informations.
You can get an estimation of the time the various methods would take on your drive (if supported):
# nvme sanitize-log /dev/nvme0
...
Estimated Time For Overwrite                   :  4294967295 (No time period reported)
Estimated Time For Block Erase                 :  174
Estimated Time For Crypto Erase                :  34
If instead you get a result such as:
# nvme sanitize-log /dev/nvme0
...
Estimated Time For Overwrite                   :  4294967295 (No time period reported)
Estimated Time For Block Erase                 :  4294967295 (No time period reported)
Estimated Time For Crypto Erase                :  4294967295 (No time period reported)
Then be sure that the operation will take a long time to complete. For reference, a Block Erase took around 2-3 hours to complete on the Intel 660p 512GB reporting those results.
To start a Crypto Erase sanitize operation:
# nvme sanitize device --sanact=4
<device> parameter is mandatory NVMe character device (e.g. /dev/nvme0 and not /dev/nvme0n1), as the operation applies necessarily to whole devices.For a Block Erase:
# nvme sanitize device -a 2
You can follow the progress with the Sanitize Log:
# nvme sanitize-log /dev/nvme0
Example output for a drive with a Crypto Erase in progress:
Sanitize Progress                      (SPROG) :  655
Sanitize Status                        (SSTAT) :  0x4
Sanitize Command Dword 10 Information (SCDW10) :  0x4
Estimated Time For Overwrite                   :  4294967295 (No time period reported)
Estimated Time For Block Erase                 :  174
Estimated Time For Crypto Erase                :  34
Estimated Time For Overwrite (No-Deallocate)   :  0
Estimated Time For Block Erase (No-Deallocate) :  0
Estimated Time For Crypto Erase (No-Deallocate):  0
When the command has completed successfully:
Sanitize Progress                      (SPROG) :  65535
Sanitize Status                        (SSTAT) :  0x101
Sanitize Command Dword 10 Information (SCDW10) :  0x4
Estimated Time For Overwrite                   :  4294967295 (No time period reported)
Estimated Time For Block Erase                 :  174
Estimated Time For Crypto Erase                :  34
Estimated Time For Overwrite (No-Deallocate)   :  0
Estimated Time For Block Erase (No-Deallocate) :  0
Estimated Time For Crypto Erase (No-Deallocate):  0
Troubleshooting
UEFI boot entries get removed after wiping a drive
Some UEFI implementations remove boot entries referencing nonexistent files upon system startup. If you plan to restore the system from a backup after memory cell clearing, make sure to also restore the boot entry using efibootmgr or by reinstalling the boot loader.
See also
- Secure Erase HDDs/SSDs (SATA/NVMe) using hdparm & nvme-cli on Linux (2019): good tutorial with images
- Verifying SSD Sanitization